Building a custom form
Implementation methods
There are multiple methods for building a custom form with Customer Fields. For most cases, you can simply use our form builder to create and customize a form. Please consider the following methods to find the best match for your use case:
-
Customize an embedded form with CSS and/or front-end Form API
You can use the app’s built-in CSS editor to add your own rulesets to a page in order to change the look and feel of a form. You can also use the JS Form API if you need to add special interaction to a form that can’t be accomplished using the features inside the form builder. -
Use data binding with your own markup
If you need your own HTML form markup, you can build a custom form without needing to write any JavaScript using data binding. We automatically integrate the data into your fields using thenameattribute. This is the method covered in this guide. -
Use the front-end Customer API
For any other custom interactions, you can use our JS Customer API, which doesn’t interact directly with the document. Instead, you manage the values from the user and useCF.customer.setto save data directly to the customer.
Custom form challenges
There are several challenges to be aware of when building a custom form:
Properly formatting phone numbers
Phone numbers need to be a specific format, enforced by Shopify. For example, if you’re in the US, you can’t just send253 555 1234. It needs to be in E.164 format:+12535551234. Libraries such aslibphonenumber-jscan help you accomplish this.
Ensuring addresses are valid
Shopify is picky about which values can be present for thedefault_address.countryanddefault_address.provincefields. For instance, if you passUnited States of Americainstead ofUnited States, Shopify will reject the request with errors. See theCF.customer.countriesglobal variable for a set of valid country/province names and codes that you can use.
Handling server errors
Front-end validation can’t catch everything, such as emails or phone numbers already being taken by another customer account. If the customer inputs data that causes these errors, you’ll need to properly parse the errors from our servers and show them on the page. We wrote a whole page on how to do this.
There are many other use-cases that our embedded forms can cover, all of which require little-to-no effort on your part. However, if we are missing functionality that your use-case requires, please let us know and continue on!
Step 1: Add the JS Customer API to your theme
Make sure you’ve followed the instructions on how to install developer tools in order to include our lightweight API for your usage.
Step 2: Create a form
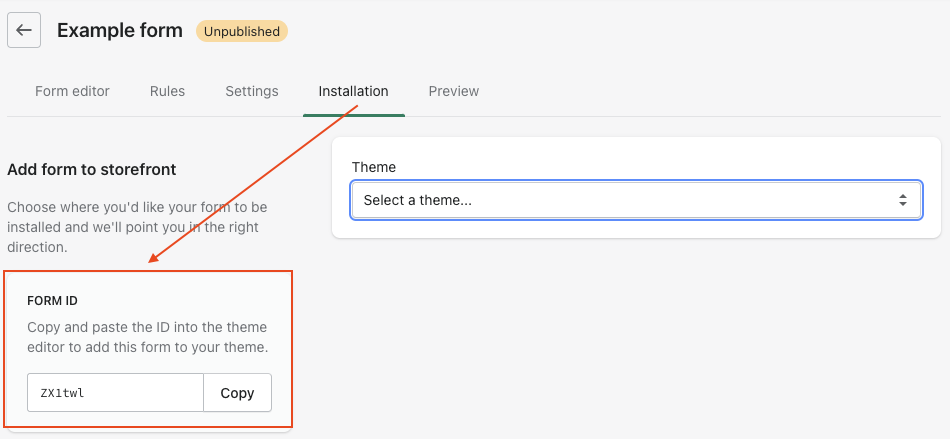
Some of our features such as customer tagging and submission tracking rely on a form being created. Create a form and name it “Custom development” or whatever is most relevant to your use-case. You don’t necessarily need to add fields to the form.
Take note of the form’s ID found on the Installation tab, as you will need it later:
Step 3: Create new data columns
For this example, let’s collect a few bits of custom data: shirt and shoe sizes. Go to the ‘Data columns’ page in the app, and create two data columns:
| Label | Key | Data type |
|---|---|---|
| Shirt size | shirt_size | text |
| Shoe size | shoe_size | text |
Note
You’ll need to be on at least the Pro plan to create custom data columns.
Step 4: Hook up Customer Fields to your registration form
We expose a library called Rivets, which serves to interpolate customer data with the DOM. In this case, we’re going to use a rivets binder that we built called rv-cf-custom-form that hooks up the form to Customer Fields.
Let’s start off with a basic registration form that most (if not all) themes are very similar to:
{% form 'create_customer' %}
  {% if form.errors %}
    {{ form.errors | default_errors }}
  {% endif %}

  <div>
    <label>First name</label>
    <input name="customer[first_name]" type="text" />
  </div>

  <div>
    <label>Last name</label>
    <input name="customer[last_name]" type="text" />
  </div>

  <div>
    <label>Email</label>
    <input name="customer[email]" type="email" />
  </div>

  <div>
    <label>Password</label>
    <input name="customer[password]" type="password" />
  </div>

  <button>Create account</button>
{% endform %}
You’ll then need to add four attributes to the {% form %} tag: action: '', data-cf-view: '', rv-cf-custom-form: '' and data-cf-form-id: '<your form ID>'. Make sure to use your development form’s ID instead of the one shown in the example below:
{% form 'create_customer', action: '', data-cf-view: '', rv-cf-custom-form: '', data-cf-form-id: 'gBXtJo' %}
  <!-- ... form content ... -->
{% endform %}
P.S. - It actually doesn’t matter what type of form is specified, it could be create_customer or new_comment. It doesn’t even need to be a liquid {% form %}, it just needs to be an HTML <form>.
IMPORTANT: Notice the attribute you’re adding for
action: ''. Setting the action attribute to a blank value prevents Shopify’s recaptcha from intercepting the form’s submission event. If you don’t override it and you have Shopify’s recaptcha setting enabled for customer forms on your storefront, the form will not submit properly.
Here’s the function of each additional attribute:
data-cf-view
This attribute binds Rivets to the element and all of its children. This allows you do to things like:
<div data-cf-view>
  <h1>Hello, {customer.first_name}!</h1>
</div>
Note: that syntax isn’t Liquid! It’s rivets templating.
This is super helpful in the case where the data collected during the session hasn’t been sent to Shopify just yet, as that data isn’t available in Liquid (read more about guest data.)
rv-cf-custom-form
This is a Rivets binder that we built which submits the form’s data to our servers on submit, instead of sending it straight to Shopify. This will allow custom fields to be saved.
data-cf-form-id
This allows Customer Fields to track form submissions from your custom form, which become visible on the Forms page. This also connects whitelisted tags set up in the form builder to your custom form, which enables customer tagging.
Step 5: Add custom fields
For each field, the value of the name attribute needs to be in one of the following formats:
name="customer[column_key]"name="customer[parent_column_key][][child_column_key]"
{% form 'create_customer', action: '', data-cf-view: '', rv-cf-custom-form: '', data-cf-form-id: 'gBXtJo' %}
  <!-- other fields -->

  <div>
    <label>Shirt size</label>

    <select name="customer[shirt_size]">
      <option>Extra small</option>
      <option>Small</option>
      <option>Medium</option>
      <option>Large</option>
      <option>Extra large</option>
    </select>
  </div>

  <div>
    <label>Shoe size</label>
    <input name="customer[shoe_size]" type="text" />
  </div>

  <button>Create account</button>
{% endform %}
Tip
If you need to use radio buttons and/or checkboxes, check out our guide on how to use them in a custom form.
Step 6: Handle server errors
Start off by removing any usage of the {{ form }} object in liquid, as it will not do anything anymore. If it does, then something is wrong, and the form is most likely not submitting to our servers properly.
It’s up to you to inform the customer on how to fix issues when they arise. Luckily, it’s easy to display form errors using rivets:
<ul class="errors" rv-if="has_error">
  <h5>Please fix errors:</h5>

  <li rv-each-error="errors.email">
    <span rv-if="error | eq 'verify'">
      Email must be verified.
    </span>

    <span rv-if="error | eq 'taken'">
      Email has already been taken.
    </span>

    <span rv-if="error | eq 'invalid'">
      Email is invalid.
    </span>
  </li>

  <li rv-each-error="errors.phone">
    <span rv-if="error | eq 'taken'">
      Phone number has already been taken.
    </span>

    <span rv-if="error | eq 'invalid'">
      Phone number is invalid.
    </span>
  </li>

  <li rv-each-error="errors.default_address.country">
    <span rv-if="error | eq 'invalid'">
      Country is invalid.
    </span>
  </li>

  <li rv-each-error="errors.default_address.province">
    <span rv-if="error | eq 'invalid'">
      Province is invalid.
    </span>
  </li>

  <li rv-each-error="errors.addresses.country">
    <span rv-if="error | eq 'invalid'">
      Country is invalid.
    </span>
  </li>

  <li rv-each-error="errors.addresses.province">
    <span rv-if="error | eq 'invalid'">
      Province is invalid.
    </span>
  </li>

  <li rv-each-error="errors.password">
    <span rv-if="error | eq 'too_short'">
      Password is too short (minimum is 5 characters)
    </span>
  </li>

  <li rv-each-error="errors.password_confirmation">
    <span rv-if="error | eq 'must_match_password'">
      Password confirmation must match the provided password.
    </span>
  </li>
</ul>
There are two rivets state variables in play here: has_error, and errors.
has_error is simply a boolean flag that is true whenever our servers reject a submission from a rivets form.
The errors object is only present if a rivets form has been submitted and our servers have returned errors. Otherwise, it is null. When it is defined, it looks something like this:
{
  email: ['invalid', 'taken'],
  phone: ['invalid'],
}
The above markup demonstrates how to properly access and display those errors. Copy and paste the example anywhere inside whatever element has the data-cf-view attribute (in this case, our {% form %} tag.)
Note
Some errors may not be applicable, so for example if you don’t have a
phonefield, you don’t need to output errors fromerrors.phone.
For this guide, we only need to handle errors from email, password and password_confirmation. We can strip out the others.
Step 7: Submitting/done states
You can tell when the form is submitting or has finished submitting by reading these variables from the rivets state: customer_saving, and customer_saved. They work exactly like you think they would, except for one thing: after the customer is done being saved, customer_saved will revert back to false after 3 seconds. Lastly, if your form is set to redirect after submitting, the redirecting variable will be set to true after a successful submission.
Here’s an example of how to handle these different states:
{% form 'create_customer', action: '', data-cf-view: '', rv-cf-custom-form: '', data-cf-form-id: 'gBXtJo' %}
  <!-- fields, errors, etc... -->

  <button>
    <span rv-unless="customer_saving | or redirecting">
      <span>Create account</span>
    </span>

    <span rv-if="customer_saving">Submitting...</span>
    <span rv-if="redirecting">Redirecting...</span>
  </button>
{% endform %}
Step 8 (optional): Change markup for logged-in customers
Some fields aren’t applicable for customers who are logged in, such as password and password confirmation. Another variable we attach to the rivets state, customer_logged_in, helps you accomplish this. Use the rv-unless binder to render the password field unless the customer is logged in:
{% form 'create_customer', action: '', data-cf-view: '', rv-cf-custom-form: '', data-cf-form-id: 'gBXtJo' %}
  <!-- other fields -->

  <div rv-unless="customer_logged_in">
    <label>Password</label>
    <input name="customer[password]" type="password" />
  </div>

  <!-- other fields, errors, submit button -->
{% endform %}
Lastly, you might want to change the submit button text from “Create account” to “Update account”. To do this, we’ll conditionally render <span> tags inside of our <span rv-unless="customer_saved"> element:
{% form 'create_customer', action: '', data-cf-view: '', rv-cf-custom-form: '', data-cf-form-id: 'gBXtJo' %}
  <!-- other fields, errors -->

  <button>
    <span rv-unless="customer_saving | or redirecting">
      <span rv-unless="customer_logged_in">Create account</span>
      <span rv-if="customer_logged_in">Update account</span>
    </span>

    <span rv-if="customer_saving">Submitting...</span>
    <span rv-if="redirecting">Redirecting...</span>
  </button>
{% endform %}
Step 9: Test your form
Try submitting the form a few times, and try to cause errors to show (improper/not unique email, short password, etc.) By default, the form will attempt to redirect the customer to the account page. If something doesn’t behave correctly, check the console for warnings and errors.
Final result
{% form 'create_customer', action: '', data-cf-view: '', rv-cf-custom-form: '', data-cf-form-id: 'gBXtJo' %}
  <ul class="errors" rv-if="has_error">
    <h5>Please fix errors:</h5>

    <li rv-each-error="errors.email">
      <span rv-if="error | eq 'verify'">
        Email must be verified.
      </span>

      <span rv-if="error | eq 'taken'">
        Email has already been taken.
      </span>

      <span rv-if="error | eq 'invalid'">
        Email is invalid.
      </span>
    </li>

    <li rv-each-error="errors.password">
      <span rv-if="error | eq 'too_short'">
        Password is too short (minimum is 5 characters)
      </span>
    </li>

    <li rv-each-error="errors.password_confirmation">
      <span rv-if="error | eq 'must_match_password'">
        Password confirmation must match the provided password.
      </span>
    </li>
  </ul>

  <div>
    <label>First name</label>
    <input name="customer[first_name]" type="text" />
  </div>

  <div>
    <label>Last name</label>
    <input name="customer[last_name]" type="text" />
  </div>

  <div>
    <label>Email</label>
    <input name="customer[email]" type="email" />
  </div>

  <div rv-unless="customer_logged_in">
    <label>Password</label>
    <input name="customer[password]" type="password" />
  </div>

  <div>
    <label>Shirt size</label>

    <select name="customer[shirt_size]">
      <option>Extra small</option>
      <option>Small</option>
      <option>Medium</option>
      <option>Large</option>
      <option>Extra large</option>
    </select>
  </div>

  <div>
    <label>Shoe size</label>
    <input name="customer[shoe_size]" type="text" />
  </div>

  <button>
    <span rv-unless="customer_saving | or redirecting">
      <span rv-unless="customer_logged_in">Create account</span>
      <span rv-if="customer_logged_in">Update account</span>
    </span>

    <span rv-if="customer_saving">Submitting...</span>
    <span rv-if="redirecting">Redirecting...</span>
  </button>
{% endform %}
Using radio buttons and checkboxes
There are some caveats to the rv-cf-custom-form binder that require workarounds in order to use radio buttons and/or checkboxes. If you need to use these fields, check out our guide.
Other form options
You can control the redirect_url, whether or not the form should login or redirect at all by specifying the following hidden <input> elements inside your form:
<!--
  control where the form redirects to after a successful submission.
  the name can be either return_to or return_url too!
-->
<input type="hidden" name="redirect_url" value="/account" />

<!-- disable redirecting altogether -->
<input type="hidden" name="redirect" value="false" />

<!-- disable auto-login for new customers -->
<input type="hidden" name="login" value="false" />

<!-- change the submission method to guest -->
<input type="hidden" name="guest" value="true" />
All done!
Nice work! You’ve built yourself a custom form that you can expand on to collect all kinds of information, all without writing any JavaScript. If you have any questions or feedback, feel free to get in touch!